 Webdecorum
 Webdecorum
Most of you know that Shopify is one of the most popular e-commerce platforms in the world now. But, how big is it?
How many people can use it?
Right from its inception, Shopify has made massive changes in the online business sector. It hosts a diverse array of businesses these days.
Shopify’s total revenue experienced a whopping increase of 26% in 2022, reaching $1.7 billion. It loosely translates to a 28% increase on a constant currency basis. Right now, the Shopify App Store has more than 3200 apps, and the total revenue within the first quarter of 2021 was $988.6 million.
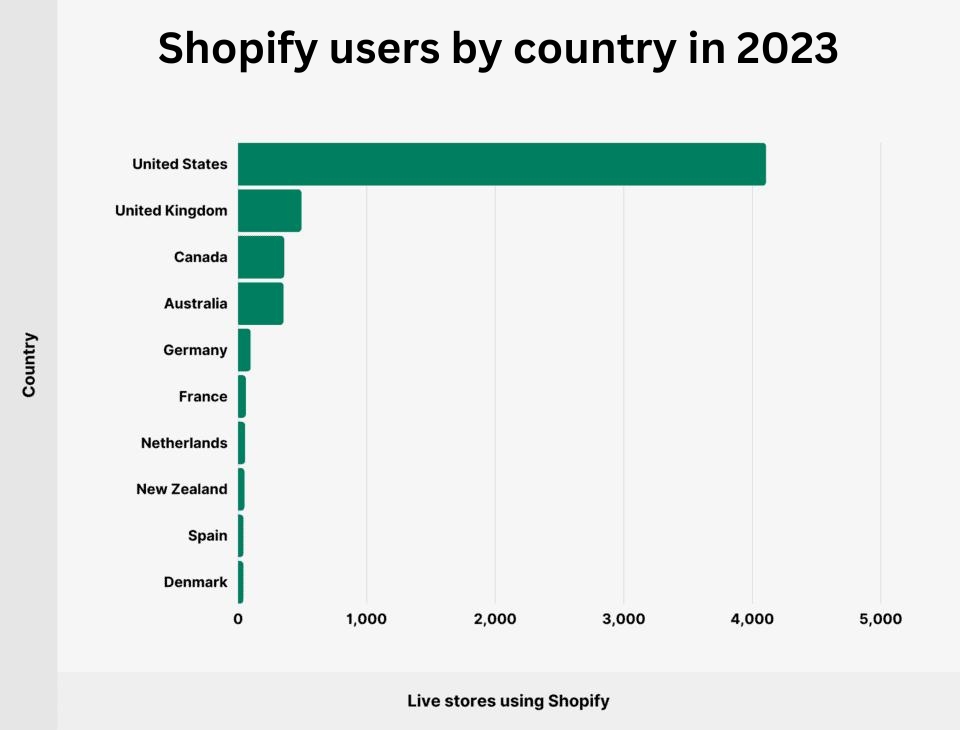
From March 2020 to January 2022, the number of active members has skyrocketed by 201%, which totals a staggering 3.75 million in 2022. Right now, more than 7000 employees are working for Shopify, which clearly shows the importance this platform holds.
If this is your first time with the Shopify store setup, then you need professionals to help you with the guiding process. Our team from Webdecorum is here to talk about the vital steps to address, in order to create a Shopify e-commerce platform for your business growth. This guide will talk about the store setup services, particularly focusing on beginners.
Source: backlinko.com
Plan the store first:
It is true that planning needs to be done before you proceed further with opening a Shopify store. This part will take some time so be prepared accordingly. Before you start with the process, there are some questions you need to answer first.
- Are you planning to open an e-commerce platform on your own or do you have a partner?
- If you are working with someone, how are you planning to split up the work and profit?
- In case you are in one serious relationship, will your partner support your long hours of work?
Once you have the logistics and goals jotted down, it is important to think about the product categories. Creating a mind map is always a good call for that. Before you start setting up your online store, there is a planning checklist you need to create.
- Create the mind map on how things will be organized
- Determine the time and money you are comfortable sharing in this project
- Think if you are starting a small business or trying to turn it into a main venture.
- Speak with your partner to check out the logistics
- Write the current income goal.
Selecting the name of the store:
Naming your store is a big deal. It will form the soul of your business and we at Webdecorum are well aware of that point. The name of the store does not have to be the legal business name. If you are thinking about something different, you need to file for a DBA.
Most people think about whether they have to register a business before opening a store. Well, you need not have to worry about registering unless you are earning from it. You can always register once you start making money.
- In order to name your store, make sure to keep it short and simple.
- It should be something that is easier to remember.
- Try to be original with your name.
Your domain name is the one that the customers will type in the browser’s URL bar. In most instances, the domain name is your store name. You can register the name through Shopify as the easiest method. Before you settle on a store name, remember to check if the domain name is available.
Creating a Shopify account:
To start a 14-day free trial, visit www.shopify.com/signup. Here, you have to enter your name, email, and store name. You can change the store name later.
- Once you have created a store, you have to visit the information page. Here, your answers are going to affect the advice emails that Shopify will send you in the newsletter.
- Then on the next page, you have to enter the name and mailing address.
- In case you have started a corporation, use a business address. Otherwise, your home address will do. Click on “Enter my store” and you are all set.

Source: shopify.com
Customize the theme through Shopify:
Now, you will come across lots of options to click on. The very first thing to consider is the theme of the store. A theme will be a pre-created web design that you can add to your store without focusing on writing codes. There are hundreds of them to choose from.
- In order to edit the theme of your store, click on “online store” and then “Themes.” Then click on the “Visit Theme Store” button.
- This way you will come across the theme store in Shopify, where you will have free and paid themes to work with.
- In order to save you some time, our team from Webdecorum has mentioned some of the best themes to look for. Some examples are Minimal, Startup, Symmetry, and more.
After selecting the theme, it is time to customize it. For that, you have to click on the “customize” button from the Themes section. Be sure that the theme you are planning to customize should be from the theme store only.
Optimizing the setting of the store:
Even though the default settings are up to the mark, there are still some things that you can add and change to make the most of a shiny new store. For that, you need to click on the “Settings” button, located at the bottom left of the dashboard.
- Here, you get the opportunity to edit the name, email, and address of the store.
- The “account email” is the one that Shopify will use to contact you. Then you have the “customer email” used by your customers to send you emails.
- If you have a legal name for your business enter that and edit the address when the need comes.
- Under the “standards and formats” section, you have to set your time zone of working and standard information like the weight units.
- In the “Prefix” box, you can add something if you plan to open multiple stores. After that, you need to click on the “save” option.
- In the payment provider area, select “Complete account setup” to configure your payment getaway so that the customers can use the credit cards to purchase. Fill out the page in detail.
- Then you have the “Statement Descriptor” section, where the customers will get to see what’s written on the billing statement. You can add your company name over here.
- Fill out the rest of the information as asked for and then click on the “complete account setup” button.
Shopify will set PayPal as the default payment option. You can even add other payment providers later on like Apple Pay. These steps are simple yet important when you are looking for Shopify store setup services for the first time.
The checkout settings:
Under this banner, you have to switch the “customer accounts” to “optional” mode. It means now the customers get to create the account, even though it is not mandatory. For the next “form options,” you have to check on the first and last name notion.
For “email marketing,” it is important to check the “preselect the sign-up option” for marketing to more than just your customers.
Remember to go through all the remaining settings on this page to see if everything is up to the mark. In case you have set up Facebook Pixel or Google Analytics, be sure to add the custom conversion code in the “Additional Scripts” section. When you are done with the changes, click on the “save” option.
Now for the shipping settings:
The shipping settings will completely depend on how you are planning to ship your items. We, at Webdecorum, have listed some of the points for your reference.
- Dropshipping: In case you are dropshipping, you have to use “price-based rates.” Anyone with a $10 order can pay one rate and anyone with a $30 order can pay using a different shipping rate.
- Shipping items yourself: When shipping items on your own, use the discounted rates from USP for the Shopify stores. It helps in calculating the shipping on your behalf that the customers have to pay.
The account settings:
In case you have a virtual assistant or a partner, then you can give them an account over here. You have to click on the “add staff account” and then select the areas you want them to have access to.
The legalized settings:
The legal setting is one major part of the Shopify store setup service and needs to be handled with care. Without it, you will be operating illegally and have the chance to get your business swiped off anytime.
- Each online store needs a “privacy policy,” “refund policy,” and “terms of service of ToS agreement” plan.
- Shopify can help in generating one for your store, depending on the settings chosen. But, we will highly recommend you get legal advice from a solicitor once you start earning from the store.
- For the legal pages, you have to click on the “create from template” buttons available under each section.
- After that, it is time to create pages for every document. For that, you need to right-click on the “online store” option and then open it in a new tab. Under this section, click on the “pages” and then “add page” option.
- Name the first page as Refund Policy. Then revisit the legal settings tab and copy the entire refund policy. Paste it under the Refund policy page. Click on the “save” option and repeat the same steps for the “terms of service” and “privacy policy” pages.
The preferences setting:
This is the only setting that will be not under the “settings” page. For this, you have to visit the “preferences” section under “online store.”
- Here, you have to edit the Meta title and description of the store first.
- The maximum title length should be 60 characters and the description will be within 160 characters.
- Be sure to add your keyword in both the title and description.
- Once you have set up these points, add the Google Analytics tracking code.
- Later, you will come across the Facebook Pixel ID section. You need a registered domain for that as well.
The password of the store is within the security section. You have to disable the password so that anyone gets the chance to visit your site. But, avoid doing that unless your store is ready for the public.
Registering domain name with Shopify:
If you are trying to register your domain name with the help of Shopify, there are some steps you need to address that.
- Visit the Shopify admin first and go to “online store.” From there, click on the “domains” option.
- After that, click on the “buy new domain” button.
- Enter the name that you are planning to purchase.
- Later, you will come across all the available extensions and their varied prices. The extension options will have common ones like .biz or .com, country extensions, and premium ones. The prices will vary so go through the options carefully.
- Now, click on the “buy” option next to the domain you are planning to purchase.
These are the simple steps to follow when you are trying to purchase a domain name. Be sure to go to “domain” settings and then select the name you have purchased to be the default URL.

Source: shopify.com
Creating essential pages:
When the settings are properly configured, there are other pages that you need to work on. Those are the “contact us page,” “about us page,” and “shipping policy page.” There are simple tricks and tips involved to help you create these pages with ease.
Maybe you are not sure of the right steps to take and that’s when our team from Webdecorum comes to your rescue. We will help you to set up a Shopify store for your business so that you can just sit back and relax.
Adding products to the store:
Now the time comes for you to add products to your store. For that, you need to click on the “products” category and then click on “add product.”
- Title and description: Here, you have to enter the product’s title and description. Talk about the product benefits first and then the features. People purchase items based on emotions and needs.
- Images: Images are vital for selling any item online. If the image sucks, then you will lose sales and credibility. If you have the pictures already, you can set up your store within an hour.
- Organization: Product type is the type of item that you sell. It is one way to create product collections. Then you have vendor, which is used for shipping and inventory purposes. Unless you are adding a vendor API, you don’t have to worry about this point. Collection setting will help you to add products manually to the product collection to help customers browse through the inventory. Lastly, you have tags, which are ways to organize products into collection and improving the search function of the site.
- Pricing: It is pretty straightforward and price is what your customers will pay. You can “compare at price” next to the actual price to use the price anchoring.
- Inventory: The inventory setting will help in keeping a track of the inventory. You can easily work on custom SKU for the items if you want. Or else, you can leave the settings alone.
- Shipping: In case you are shipping items using USPS Discounted Rates, then you have to adjust the shipping settings.
Apart from these points, you need to focus on Meta title and descriptions, which will show up in search engine pages.
Creating the collections:
Collections are mainly group of same products, based on types, tags and vendors. It helps the customers to find same products. In order to create one, click on “Collections” and then on “Create collection.”
- Much like the product pages, the Shopify Collection Pages will also have a title and description. It is best to create a description when you have a minimum of two products within your collection.
- On the other hand, you can manually add items to your collections by clicking over there and searching for items under “products” section. Then select the items that need to be added.
- You can even automatically add items by setting “collection type” to “automated” and set conditions to what you like.
Adding the discount codes:
This is an optional step and shows you ways to create discount codes. For adding discounted codes, visit “Discounts” and then to “Code.” After that, generate the code and set up the parameters.
Familiarity with the orders page:
For managing your orders, you have to visit the “Orders” page. Unless you select a plan for the store, you won’t be able to see this page. You will receive a free trial for 14 days. Once you have selected a plan, it expands on what you can do and you will then be charged after 14 days.
On this page, you can see any order that comes along with customer details and order status. Once an order has been shipped, you have to update the order to “shipped.”
Reviewing analytics and setting up Google Analytics:
Make sure to focus on the “Analytics” page now. It is one way to see the number of traffic your store is getting and the pages that users visited the most. You will also learn about the items selling more.
Add some of the recommended apps:
Apps are software that you can download for adding functionality to the store like discount pop-ups, customer reviews and more. Some of the apps are free and there are others, for which you need to pay certain price. Some of the best apps for you to get right now are:
- Oberlo for dropshipping
- Crush-pics for image compression
- Sumo for email marketing
- YOTPO for customer reviews
Choosing the right paid plan:
Once all the above-mentioned steps are done and dusted, you are left with choosing a plan and removing password from the store. Click on the “Select a plan” option on the bottom of dashboard. There are three options available namely:
- Shopify
- Basic Shopify
- Advanced Shopify

Source: shopify.com
You can always start with the “basic Shopify plan” unless you are pretty sure to have over $20,000 sales per month. The difference within these plans will focus on the cost per sale along with $0.30 for the transactions made.
The final say:
Make sure to go through each and every point mentioned above to learn more on steps to setup a store in Shopify. Our team from Webdecorum will always help you with better understanding.
For more information and free consultation, please contact us.


